Binary City Time - Knowledgebase
Enrollment - F17 (Fingerprints)
11 Views •Enrollment - F17 (RFID Card)
5 Views •Enrollment - VF380
4 Views •Fingerprint enrollment on K30 Device
5 Views •Ensuring Time Comm is running
6 Views •Understanding Comm. commands
6 Views •Setting up of device notifications
5 Views •No winter time from 2018, Namibia
5 Views •Pastel Payroll - Batch configuration
9 Views •Resetting my password
4 Views •Generating reports filtered by shift(s)
4 Views •Managing Leave in BC Time
6 Views •Creating an extra user in Binary City Time
4 Views •How to make a User inactive
7 Views •Reopening closed batches
6 Views •Adding a device in BC Time
8 Views •Setting up a device for access control/security
4 Views •Amending Attendance in BC Time
5 Views •Pro-Capture linked with FR-1500 slave
5 Views •RFID Card enrollment
7 Views •Setting up Google Authenticator
17 Views •Enrollment - F17 (Fingerprints)
11 Views •How to change the time format
10 Views •Employee future start / end date
9 Views •Pastel Payroll - Batch configuration
9 Views •Adding a device in BC Time
8 Views •How to create departments in BC Time
8 Views •Setting up your plans and billing
8 Views •CSV export updates
8 Views •Fingerprint enrollment on IN01-A
8 Views •VIP Payroll export set-up
8 Views •Setting of employment date
7 Views •RFID Card enrollment
7 Views •How to make a User inactive
7 Views •How to add employee(s) to a group
6 Views •Using Google Authenticator: IOS and Android
6 Views •User interface updates
6 Views •Setting up Overtime Rules
6 Views •How to set your 2-step verification to email
6 Views •Understanding Comm. commands
6 Views •VIP Payroll export set-up
Step 1: Once logged into BC Time, go to Manage, and click on Manage under Batches.
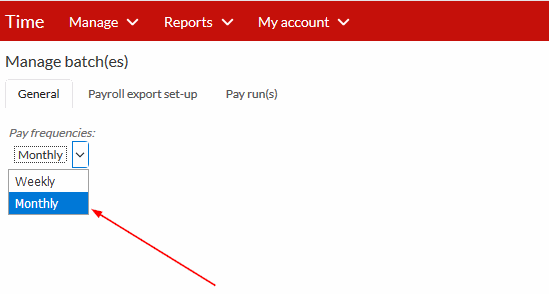
Step 2: Under the General tab, click on Pay frequencies and select Monthly.
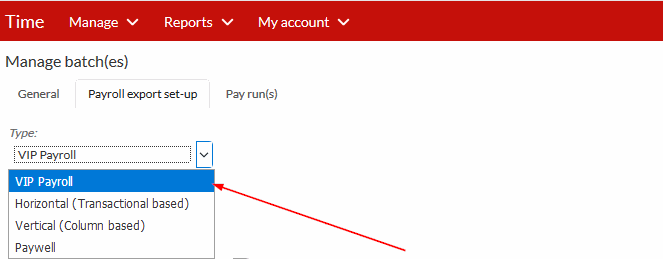
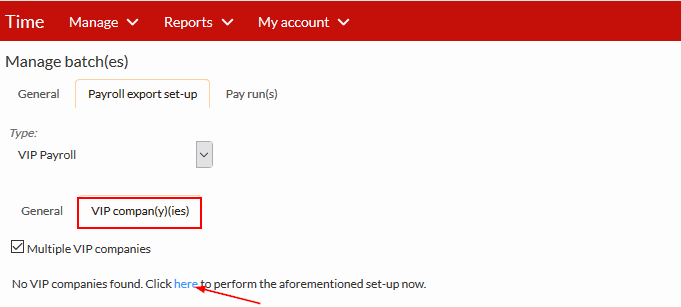
Step 3: Under the Payroll export set-up, click on type and on the drop down select VIP payroll, see screenshot illustration below.
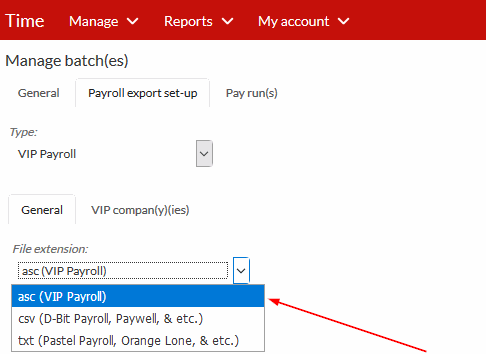
Step 4: Under the second General tab, click on File extension and select asc (VIP Payroll), please see screenshot below for guidance.
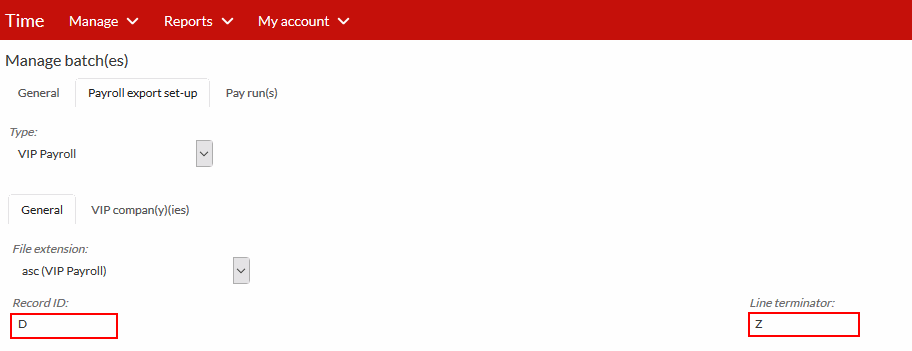
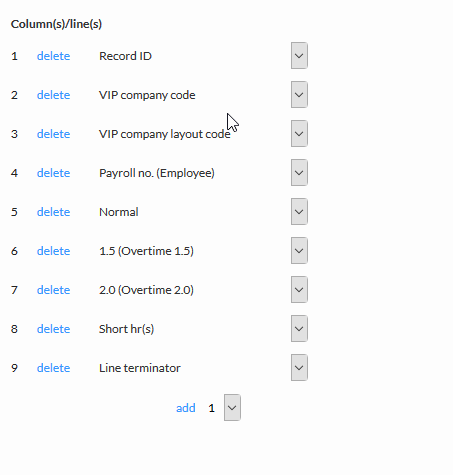
Step 5: In VIP the Record ID is always D and Line terminator is Z this is how the export file is identified.
Step 6: Under Column(s)/Line(s), here you select what you want exported, the columns selected here have to match that of the payroll system, the first four column(s) and the last are compulsory, and the column(s) that follow all depend on how your payroll system is set up. Always make sure to have the columns in the correct order. You can add as many column(s) as needed.
Step 7: Under the VIP compan(y)(ies) tab, if you have more than one company, tick the Multiple VIP companies box, if you only have one company, leave the box unchecked.
And then click on the hyperlink written here in blue to take you to the page to set up VIP companies.
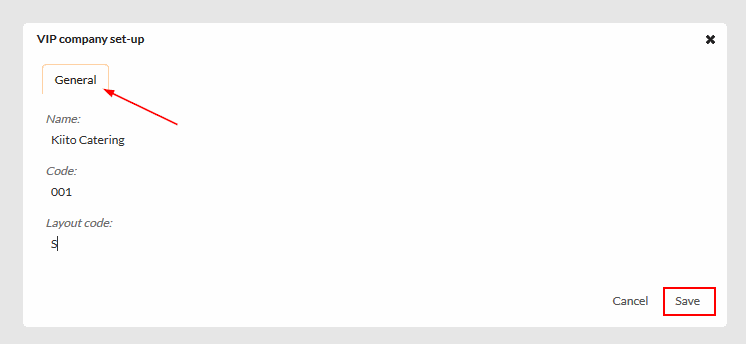
Step 8: When setting up the VIP company, under the General tab, fill in the name, this should be the same name as on the payroll system, code should also be same the same as on the payroll system and layout code should always be set to letter S.
Click save once done.
Views | |
---|---|
8 | Total Views |
0 | Members Views |
8 | Public Views |
Actions | |
---|---|
0 | Likes |
0 | Dislikes |
0 | Comments |
Share by mail
Please login to share this webpage by email.