Employees
Employee(s)
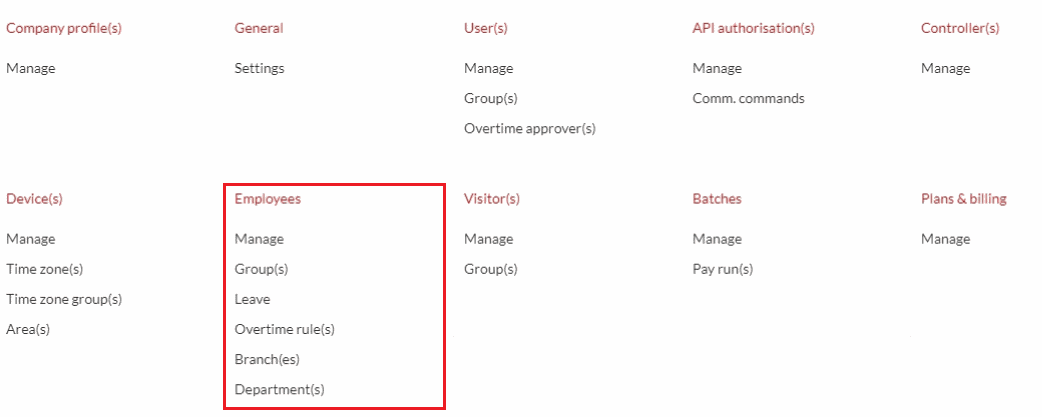
Manage
Here you will manage your employees
Step 1: Click on Employees and choose Manage

Step 2: Click on options (dots) and select New

Step 3: Enter all employee details under the General tab

Step 4: Under device details, you can choose if an employee should have administrator access to the device, or common user privilege. (Common users only clock and do not have access to enter the menu options to change settings or enroll people.) Here you can also assign a password to log into the device or assign an RFID card. Lastly, here you can link your employee to the relevant Time zone group.

As soon as all the employee details are correctly added and defined, the system will automatically update and more tabs will appear. Note: If a tab changes it's color to a light orange color, please check the details on this tab again, as this means there is an error will prevent the process from proceeding.
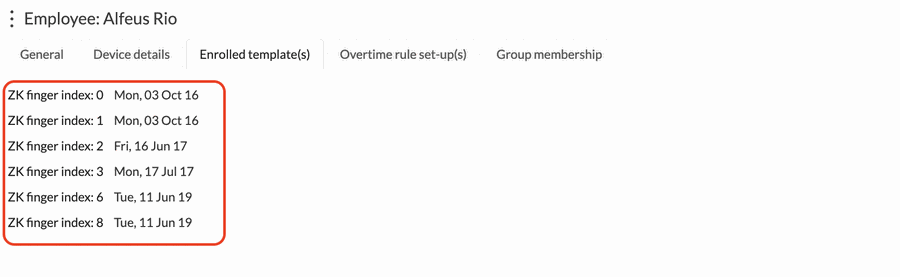
Step 5: Under enrolled template(s), you can see how many fingers or faceID (if you are using facial ID) have been enrolled for the employee, as well as the dates the fingers or faceID was enrolled.

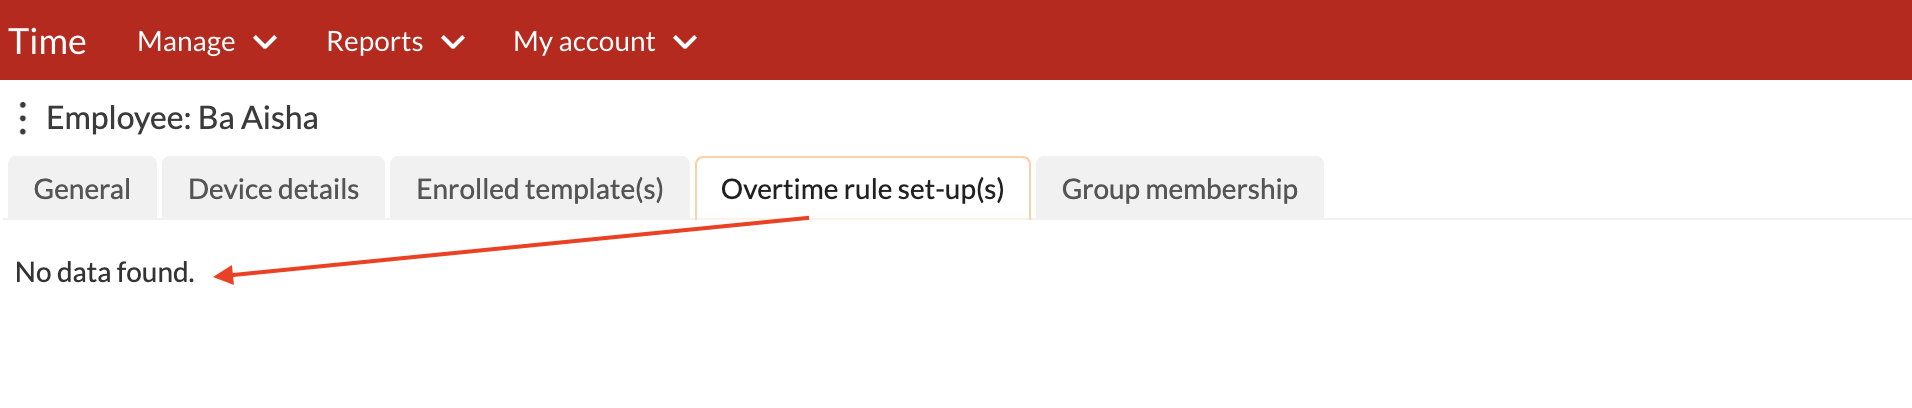
Step 6: To link an employee to an overtime rule, select the overtime rule set-up(s) tab. Next, click on ellipses button (dots) next to the employee name and then select New overtime rule set-up

- Choose the relevant overtime rule from the drop-down list, and set the effective date of the overtime rule (this feature is particularly useful if an employee has changed to a department with a different overtime rule, and you want the employee's start date at the new department to be the effective date for the newly selected overtime rule). If an employee is not assigned to an overtime rule, no overtime reporting will be available for that employee.

Step 7: Under Group membership, you can link the employee to the relevant access group

New overtime rule set-up
BC Time users are able to update more than one employee at a time to an overtime rule and specify the effective date that this rule will apply to the select employee(s). This process is made possible by the introduction of selection checkboxes in the employee management menu.
Step 1: Clicking the elipses buttons on the top left corner, next to Manage employees presents the following options:
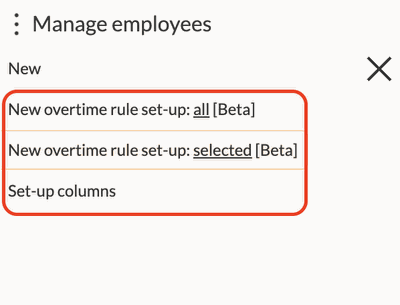
New overtime rule set-up: all: option allows the user to add all existing employees to a select overtime rule with a specified effective date based on the filters chosen.
New overtime rule set-up; selected: option allows the user to add only the selected employees to a select overtime rule with a specified effective date based on the filters chosen.
Refer to Knowledge based article on how to set this up for your profile.
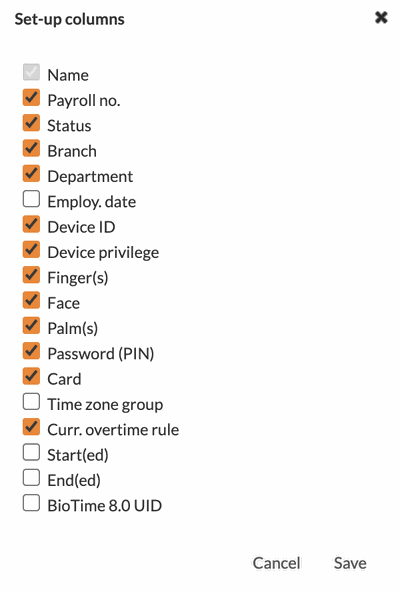
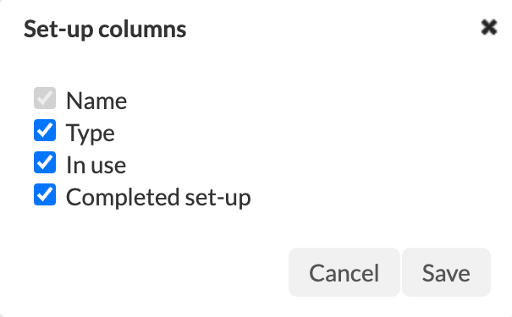
Set-up columns
This option allows a BC Time user to define which columns should be available to them under the Manage employees view. Clicking this option presents the following options which a user can toggle on or off as per their preference depending on what information they want to see displayed on the Manage Employees view:
Group(s)
Groups are granted access to different areas when using security, thus employees are linked to the group, which in turn is granted access to a specific area
Step1: Choose Group(s)

Notes for employee groups landing page:
- Name: shows you a list of all the group names
- No. of employee members: Show you the number of people assigned to the group
- You can export the employee group list in either PDF or CSV format by clicking the option
By hovering your cursor over the column headings, the option to apply change will appear, whereby you can remove the number of employees column.

Step 2: Click on elipses (dots) and select New

Step 3: Enter a name for your group under the General tab

Step 4: Assign employees to the group under the Members tab

Step 5: Assign an area(s) to the group based on the access that the employees should have.

Leave
Here you will load leave for your employees
Step 1: Click on Employees and choose Leave

Notes on the tabs option:
- The date range: You can select the dates for which you want to view the existing leave entries
- All leave types: Here you can filter, based on the type of leave which you want to view
- Branche(s): You can filter, based on the leave for the specific branch that you want to view
- All departments: You can filter, based on the specific department that you want to view
- All group(s): You can filter, based on the specific group’s leave that you want to view
- Active / Inactive: You can filter, based on the active employees or inactive employees
- All employee(s): You can select the specific employee whose leave you want to view
- You can export the filtered or unfiltered leave entries in either PDF or CSV format by clicking the option
After each filter change, you will have to click the (now orange) refresh button
Step 2: Click on ellipses button (dots) and select New

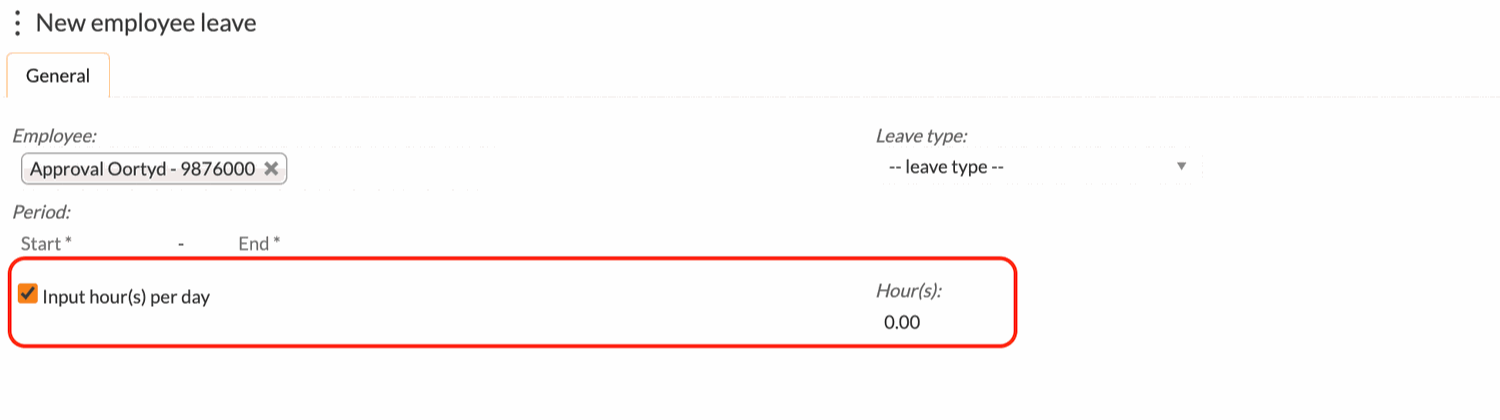
Step 3: Fill in the detail under the General tab - Employee name, leave type, and period of leave taken, start to end. Please note if you prefer to use hours rather than leave days, there is an option "Input hour(s) per day" which when selected, displays an hour(s) fill box.

Overtime rule(s)
Overtime rules tell the system how to calculate your employees' hours.
Step 1: Choose Overtime rule(s)

Step 2: Click on ellipses button (dots) and select New

Overtime rule settings:
General

Region
Under the region tab, you specify the time zone, based on the location of the company.
Day details
Click on Set-up weekdays:
When you have completed your setup, click on Save. New tabs will appear after successful saving.

Next, please refer to the Overtime tab and click on New overtime set-up

Options available:
Allocate
Of hours worked more than normal - this means all hours worked more than the normal hours specified under General
Please navigate to the Public holidays overtime tab and choose New public holidays overtime set-up

Refer to options available section above. On public holidays, however, all hours worked will be allocated as per setup (as opposed to hours worked more than normal under normal Overtime).
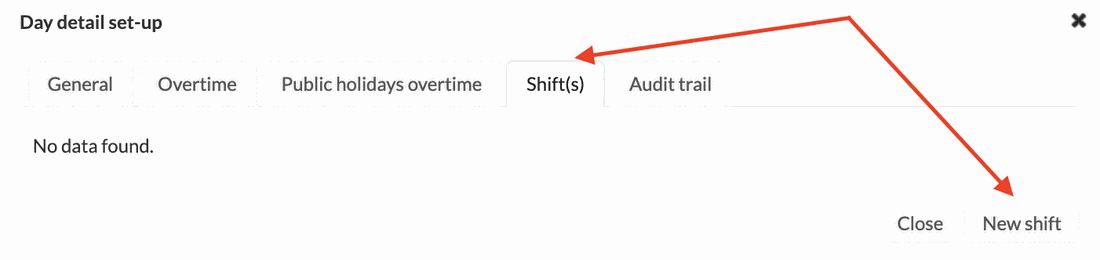
Please navigate to Shift(s) and click on New shift
General
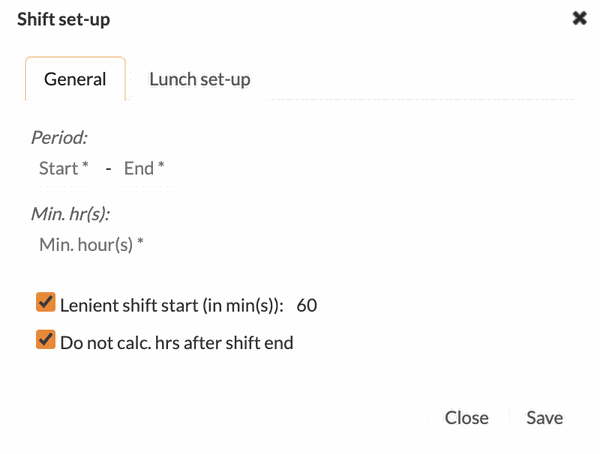
Lunch set-up
Please note lunch set up under shifts over-rules lunch set up under Days

Saturdays and Sundays
Now, setup Saturdays and Sundays as per the instructions above, and then your overtime rule is ready to be used!
Deleting and Duplicating Overtime Rule(s) & Shift(s)
Binary City Time now offers users the capability to permanently delete overtime rules including shifts that are no longer in use as well as duplicate existing overtime rule(s) and shift(s).
With this functionality in BC Time, users can delete unused overtime rules, leading to a manageable view that displays only the currently active rules. Additionally, Overtime rule(s) and Shift(s) duplication will enhance efficiency when handling various employees or departments with different working hours.
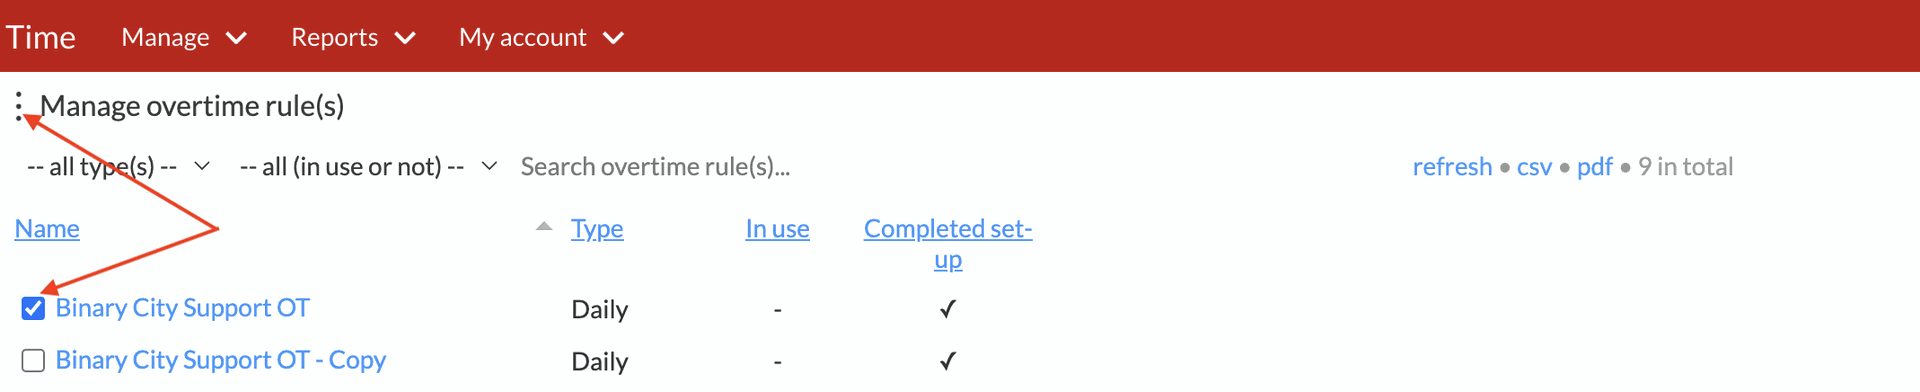
The filters
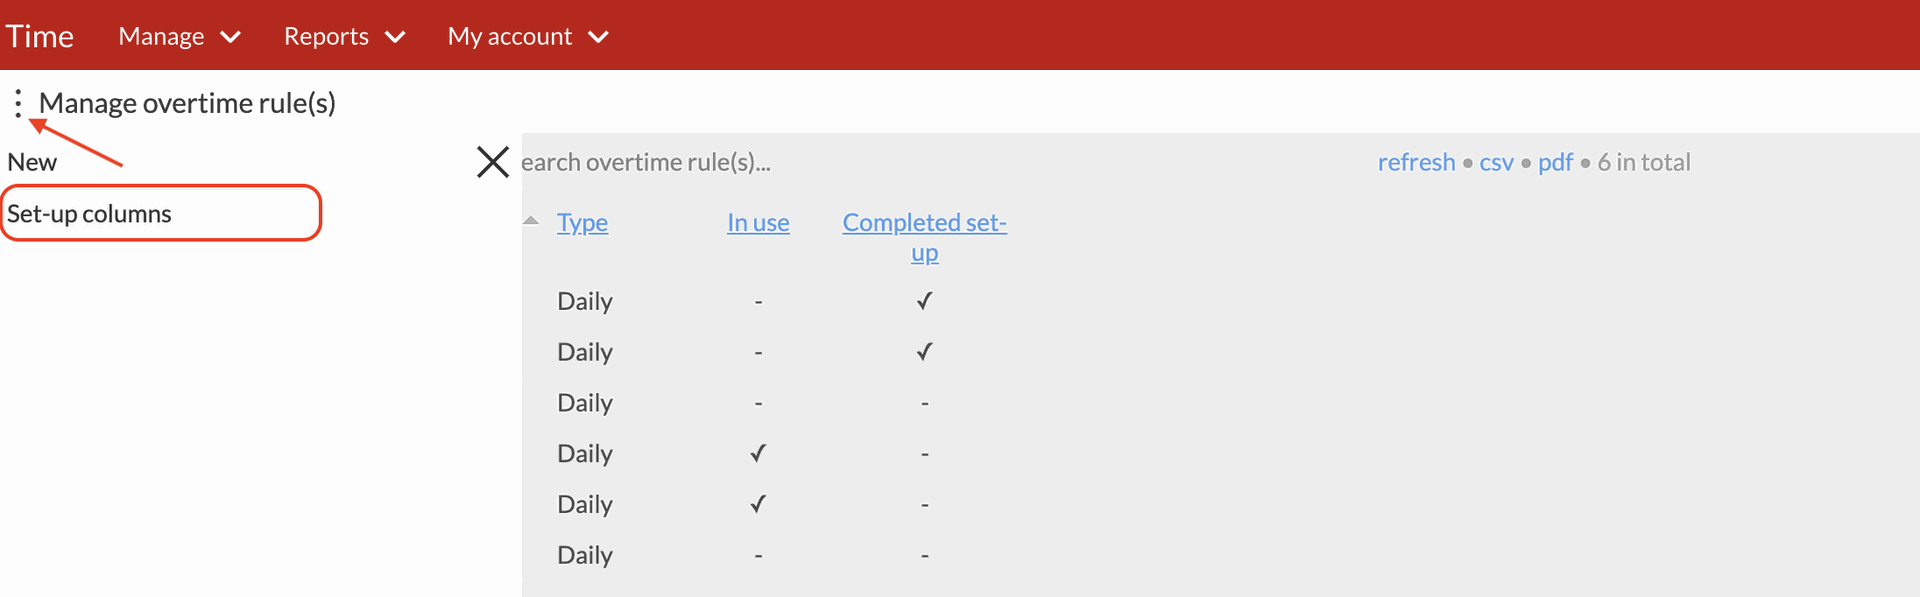
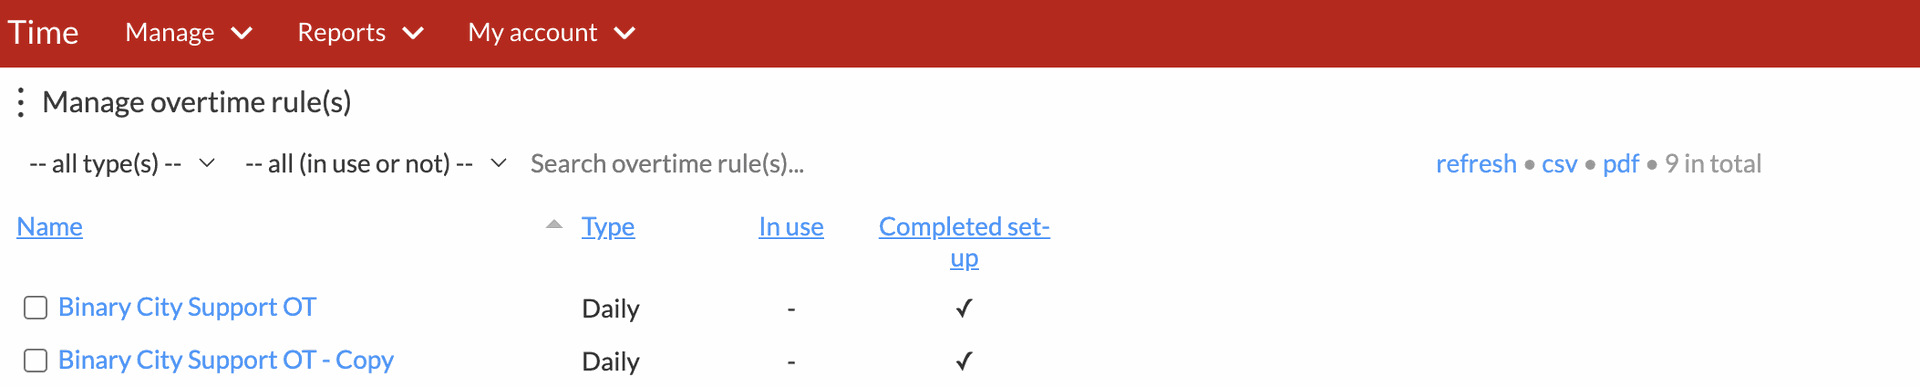
1. The Manage overtime rule(s) menu, now comes with several filters that allow you to filter by overtime rule types, overtime rules that are in use, those that are not as well as the option to search for a specific overtime rule(s).

The filter view can be easily managed by clicking the ellipses button, selecting set-up columns, and (checking) the filters you wish to display.
2. Selecting the all type(s) filter, allows the user to filter only the Daily or Period overtime rules. Alternatively, all type(s) selection will filter both.

3. Selecting the all (in use or not) filter, allows the user to filter only the rules that are in use or those that aren't. Alternatively, all(in use or not) selection will filter both.

4. Selecting the search overtime rule(s) filter, simply allows the user to search a specific overtime rule within the Manage overtime rule(s) menu.
5. The Manage overtime rule(s) menu displays the following information, the name of the overtime rule, the type, whether the overtime rule is in use (checked) or not (unchecked) including whether the overtime rule is pending setup (unchecked) or has a Completed set-up (checked) as indicated below.

Deleting overtime rule(s)
This is particularly useful in instances where a created rule is no longer in use and will not be required in the future.
1. To delete a rule, select the rule by clicking the checkbox next to the rule, and once selected click on the ellipses next to Manage overtime rule(s):
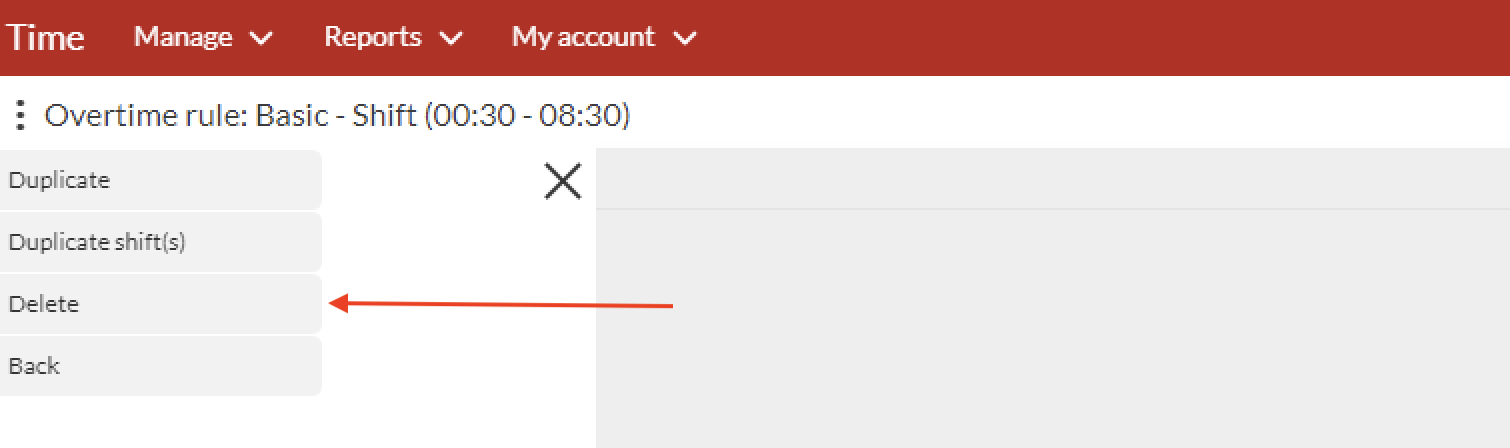
2. After clicking the ellipses, the below window will appear with the delete option.
Once you've made your selection to delete, the below pop-up window will appear for the user to confirm their selection to delete or cancel.
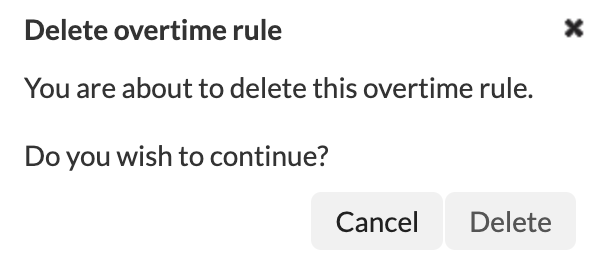
When the overtime rule is deleted the user must bear in mind that the rule will also be removed from the overtime rule set-up(s) of the employee(s) affected.
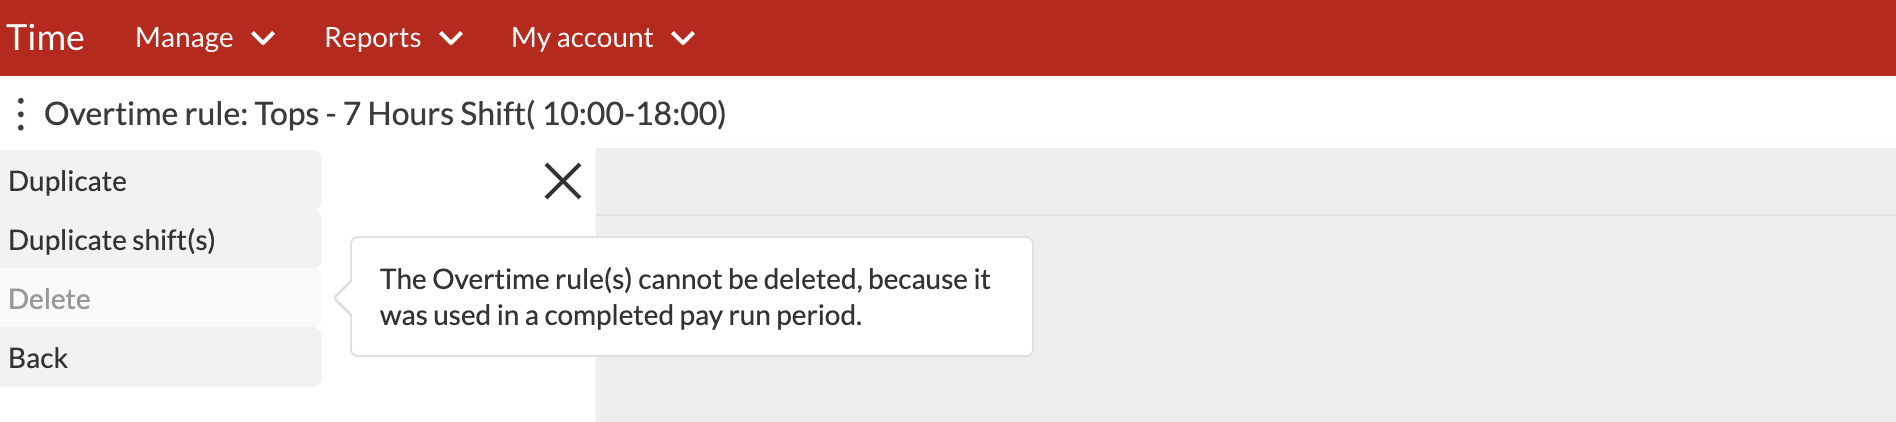
If an overtime rule is in use or was used in a closed pay-run period, deleting it will not be possible. The below pop-up window will appear with the delete option greyed out with a sliding pop-up window stating that the selected rule cannot be deleted.
Should the user then wish to proceed with deleting said overtime rule(s), then the affected pay run periods would need to be re-opened, however, doing so will change the data history affected by this overtime rule.
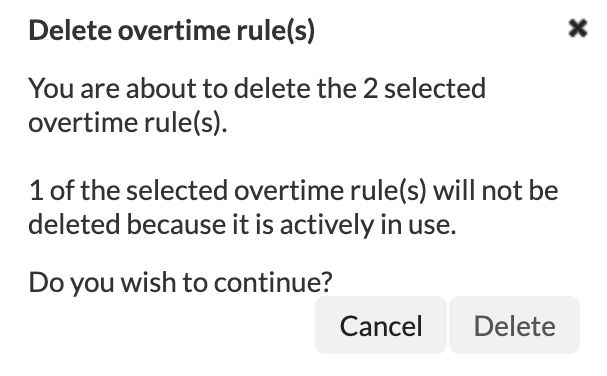
When deleting multiple overtime rules, the system intelligently understands your selection and displays the option to Delete selected.
When deleting multiple overtime rules, BC Time will also detect rules that are in use and those that aren’t and provide a pop-up message stating that “one or more of the selected overtime rule(s) will not be deleted because it is actively in use)". Should the user continue the overtime rules that can be deleted will be deleted and those that can’t will remain.
Duplicating overtime rule(s) and shift(s)
Duplicating overtime rule(s) and shift(s) is now possible in BC Time.
This becomes useful in scenarios where a user might require a similar rule with minor changes instead of re-creating the entire rule from the ground up. Duplicating an overtime rule or shift creates a mirror copy of the initial rule and shifts with its setup.
1. To use this functionality, the user should click the ellipses and the below window will appear:
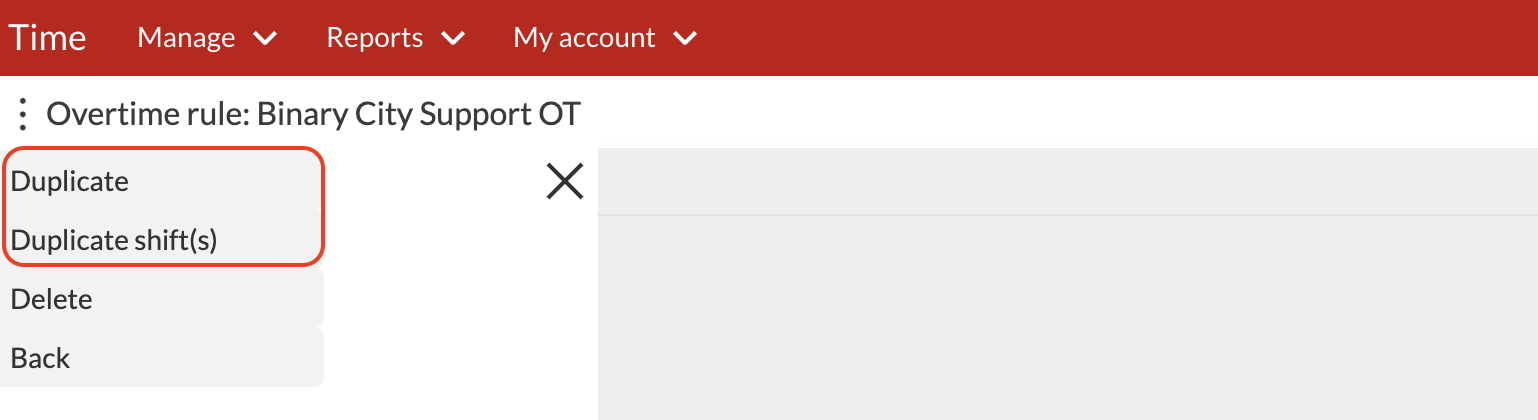
Duplicate: This will enable the user to make a copy of the selected overtime rule. In our example below, a copy of Binary City Support OT was created and indicated as a copy.
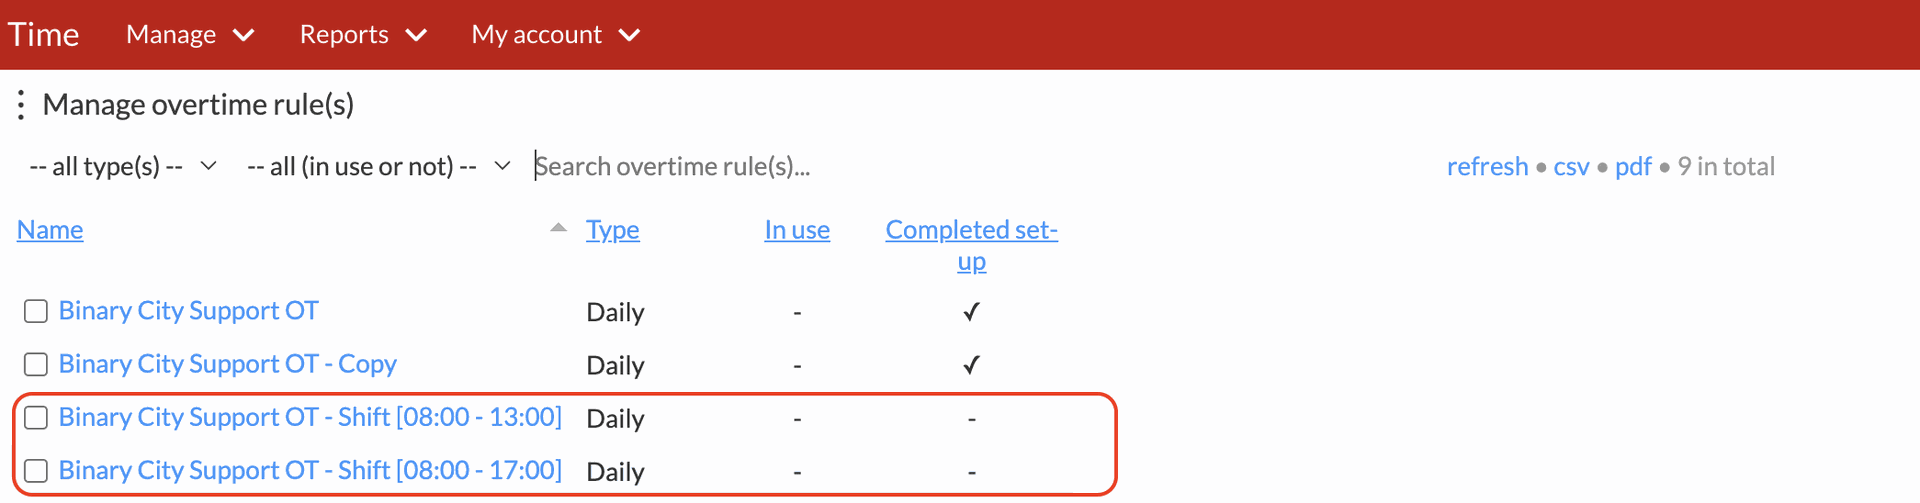
Duplicate shift(s): This will enable the user to create a copy of the shifts that have been created within a specified rule. In our example below, the shift (08:00 - 13:00 & 08:00 - 17:00) was created as a copy from shifts originally set up under overtime rule Binary City Support OT.
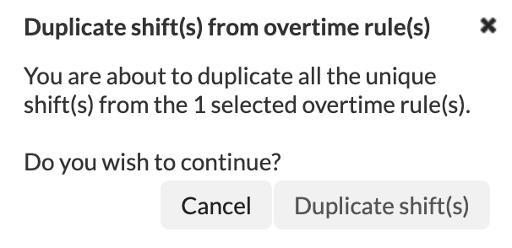
When duplicating a shift, BC Time will notify the user that you are about to duplicate all the unique shift(s) from the selected overtime rule(s) and require confirmation to proceed.
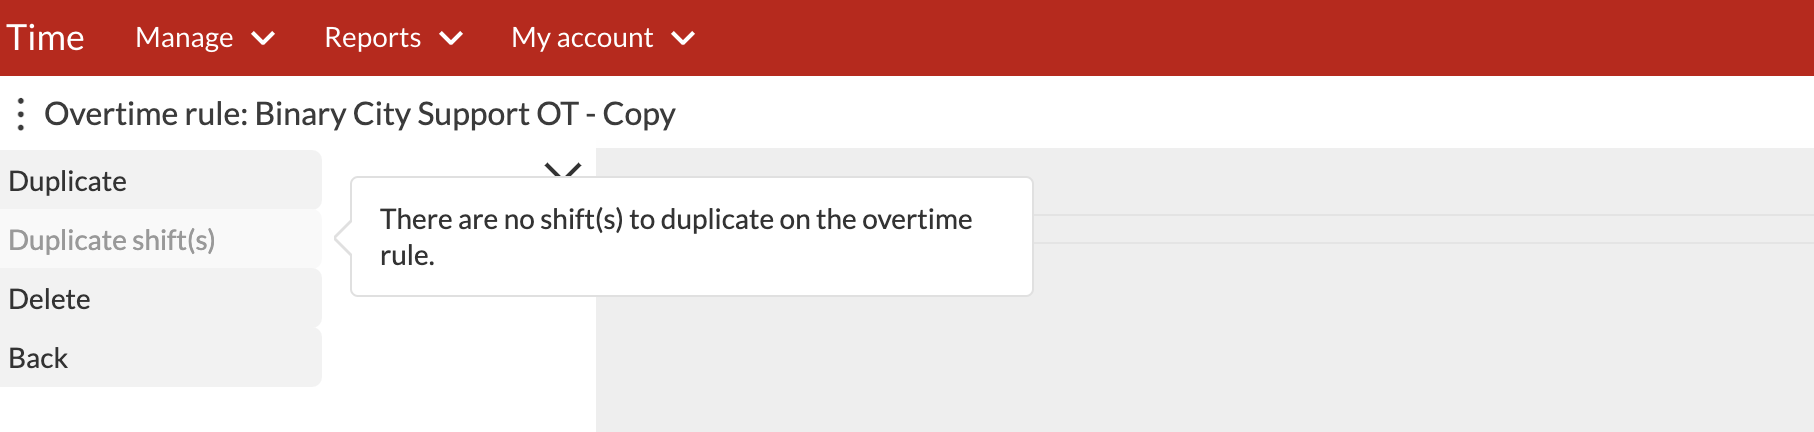
There is logic in the system that if no shifts exist then the duplicate shifts tab will be greyed out as indicated in the below view, with a pop-up advising that "There are no shift(s) to duplicate on the overtime rule":
Branch(es)
This is the Branch(es) that your employee(s) will be operating from
Step 1: Choose Branch(es)

Notes for the Branch(es):
- You have the search bar to type the name of the town/city which will create a drop down list from which you can select the department which you wish to view
- You can export the list of Branches in either PDF or CSV format by clicking on the option
Step 2: Click on ellipses button (dots) and select New

Step 3: Give your branch a name

Step 4: Type in the City name and then select it from the drop -down list.

Department(s)
This is the Department that your employee(s) will belong to
Step 1: Choose Department(s)

Notes for the Department(s):
- You have the search bar to type the name of the department which will create a drop down list from which you can select the department which you wish to view
- You can export the list of Department(s) in either PDF or CSV format by clicking on the option
Step 2: Click on the ellipses button (dots) and select New

Step 3: Give your department a name

Commenting is not enabled on this course.