Employees; attendance

Here you can find your various employee attendance reports. The filters available are "Period" (dates), "Branch", "Department", "Groups" and "Employee"
Raw
This report shows the raw data as it came from the device. The system has not altered this data in any way.
Scheduled email reporting: To find more information and steps for use of this feature, please click on the link below to visit our Knowledge Based article:
https://www.bcity.me/slides/slide/setting-up-scheduled-reporting-38
Detailed
This report is handy for everyday checking of clock-in data. You can use it to see who has clocked correctly or incorrectly, and make any corrections as needed. It can also be used to check who is on the premises at the moment (in case of an emergency requiring roll call, for example).
The detailed report is also the only report in which attendance records can be edited.
Scheduled email reporting: To find more information and steps for use of this feature, please click on the link below to visit our Knowledge Based article:
https://www.bcity.me/slides/slide/setting-up-scheduled-reporting-38

In device: the device the employee clocked in on
Out device: the device the employee clocked out on
Worked lunch: indicate when an employee worked on their lunch hour, to include this hour in the total hours worked
Excl. from overtime calculations: is for excluding the clocked hours from your overtime calculations
Audit trail: Shows you the changes which were made, by whom and when.
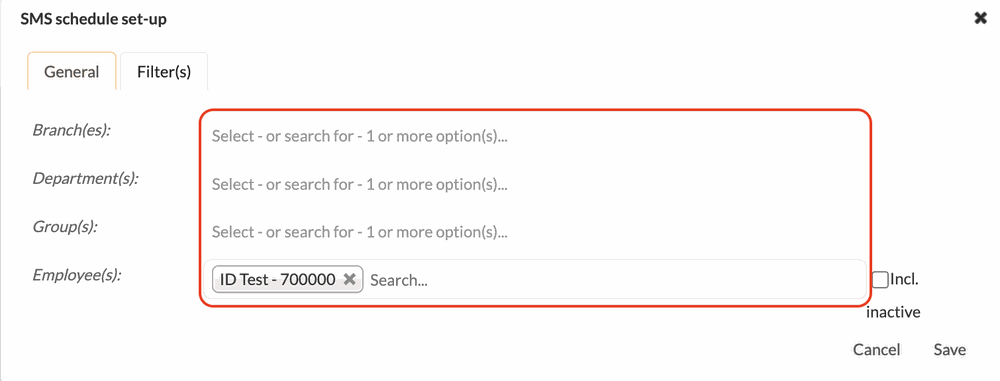
Scheduled SMS reporting (Beta): This feature allows for detailed attendance data to be sent to an employee(s) cellphone number. It is primarily valuable when you want the clock IN and OUT states received from the device(s) to be sent to the cellphone number linked to the employee's profile.

To set this up, Select New SMS schedule:
- General:
- Send at approximately: This should be set to "after received" and select the days for when this should apply.
- Once the day(s) is selected, simply apply the required filters for the feature to take effect and click save.
- Filter(s):
- Branch(es): you can filter the schedule, based on the branch for which you want to view the attendance report
- Department: you can filter the schedule, based on the department for which you want to view the attendance report
- Group(s): you can filter the schedule, based on the group(s) for which you want to view the attendance report
- Employees: you can filter the schedule, based on the employee(s) for which you want to view the attendance report
Overtime; daily
Note: daily refers to the way your overtime rule is set up. Any date range can be used.
This will show all clock in/out data per day, and summarise hours by Normal hour(s), Overtime 1.0, Overtime 1.5, Overtime 2.0 and Night-time
When exporting to PDF, each employee will start on a new page. A great tool if you wish to attach attendance data to payslips!
Notes on the page:

- Period: you select the date range for which you want to review the overtime report
- Shift(s): you select the shift for which you want to review the overtime report
- Branch(es): you can filter the report, based on the branch for which you want to view the overtime report
- Department: you can filter the report, based on the department for which you want to view the overtime report
- Group(s): you can filter the report, based on the group(s) for which you want to view the overtime report
- Employees: you can filter the report, based on the employee(s) for which you want to view the overtime report
- Incl. inactive: you can filter the report, but also include the details for inactive employee(s) as well by clicking this option
- Summarise / Incl. detail: only one of these can be selected and will either summarise the report or give you full detail of each and every clock in/out per employee
- Incl. leave: selecting this option, will include leave days in this report as well
- Incl. public holidays: selecting this option, will include public holidays days in this report as well
- Incl. absent: selecting this option, will include absent days in the report as well
- Pay run data only: this option will allow the report to only reflect data which is in the pay run
- Refresh: you select refresh to load the report based on your selections of the above OR to view the full report where no filters are applied
- Export as CSV: you can export your report in CSV format
- Export as PDF: you can export your report in PDF format
Set up Columns: here you select the columns that you want to view on the overtime report - Share: this option is for sharing a URL to the report that you are viewing, with the exact same filters that you have selected
- Close: this takes you back to the full detail of the overtime report
Scheduled email reporting: To find more information and steps for use of this feature, please click on the link below to visit our Knowledge Based article:
https://www.bcity.me/slides/slide/setting-up-scheduled-reporting-38
Overtime; daily; by shift(s)
This will show all summarized clock in/out data per employee, based on the daily shifts setup on your overtime rules.
Scheduled email reporting: To find more information and steps for use of this feature, please click on the link below to visit our Knowledge Based article:
https://www.bcity.me/slides/slide/setting-up-scheduled-reporting-38
Overtime; period
Note: Period refers to the way your overtime rule is set up. Data will be shown for the date range stated as the payrun period. This will show all clock in/out data per day, and summarize hours by Normal hour(s), Overtime 1.0, Overtime 1.5, Overtime 2.0 and Night-time for the specified monthly or weekly period stated. When exporting to PDF, each employee will start on a new page. A great tool if you wish to attach attendance data to payslips!

Notes on the page:
- Period: you select the date range for which you want to review the report
- Shift(s): you select the shift for which you want to review the report
- Branch(es): you can filter the report, based on the branch for which you want to view the report
- Department: you can filter the report, based on the department for which you want to view the report
- Group(s): you can filter the report, based on the group(s) for which you want to view the report
- Employees: you can filter the report, based on the employee(s) for which you want to view the report
- Incl. inactive: you can filter the report, but also include the details for inactive employee(s) as well by clicking this option
- Summarise / Incl. detail: only one of these can be selected and will either summarise the report or give you full detail
- Incl. leave: selecting this option, will include leave days in this report as well
- Incl. public holidays: selecting this option, will include public holidays days in this report as well
- Incl. absent: selecting this option, will include absent days in the report as well
- Pay run data only: this option will allow the report to only reflect data which is in the pay run
- Refresh: you select refresh to load the report based on your selections of the above OR to view the full report where no filters are applied
- Export as CSV: you can export your report in CSV format
- Export as PDF: you can export your report in PDF format
- Set up Columns: here you select the columns that you want to view on the report
- Share: this option is for sharing a URL to the report that you are viewing, with the exact same filters that you have selected
- Close: this takes you back to the full detail of the report
Scheduled email reporting: To find more information and steps for use of this feature, please click on the link below to visit our Knowledge Based article:
https://www.bcity.me/slides/slide/setting-up-scheduled-reporting-38
Overtime; period; by shift(s)
This will show all summarized clock in/out data per employee, based on the period chifts setup on your overtime rules.
Scheduled email reporting: To find more information and steps for use of this feature, please click on the link below to visit our Knowledge Based article:
https://www.bcity.me/slides/slide/setting-up-scheduled-reporting-38
Weekdays worked
Shows a count of how many of each day of the week an employee worked.
Scheduled email reporting: To find more information and steps for use of this feature, please click on the link below to visit our Knowledge Based article:
https://www.bcity.me/slides/slide/setting-up-scheduled-reporting-38
Hours less than normal
Shows all the days an employee worked less than the required normal hours set up.
Scheduled email reporting: To find more information and steps for use of this feature, please click on the link below to visit our Knowledge Based article:
https://www.bcity.me/slides/slide/setting-up-scheduled-reporting-38
Absent
Shows all the days an employee did not clock in, or worked less than the minimum work hours set up.
Scheduled email reporting: To find more information and steps for use of this feature, please click on the link below to visit our Knowledge Based article:
https://www.bcity.me/slides/slide/setting-up-scheduled-reporting-38
Late arrivals
Shows all the days an employee arrived later than the shift start time set up.
Scheduled email reporting: To find more information and steps for use of this feature, please click on the link below to visit our Knowledge Based article:
https://www.bcity.me/slides/slide/setting-up-scheduled-reporting-38
Set-up Columns Options
Name (Employee): Default Column that shows the name of the employee.
Payroll no. (Employee): Displays the employee's payroll number
Date: Default columns that shows the date.
Day (weekday): Default column that shows the day of the week.
Shift start: Displays the time a set shift is set to begin.
In (clock-in): Shows the time an employee clocked in.
Shift start calc.: Shows the time a shift is set to begin calculating an employee's hours.
Out (clock-out): Shows the time an employee clocked out.
Shift end calc.: Shows the time a shift is set to end calculating an employee's hours.
Shift end: Displays the time a set shift is set to end.
Description: This column provides details regarding a specific record on your report.
Total: Displays the Total hours accumulated for a specific day or period.
Normal: Displays an employee's required normal hours.
NW (Normal worked): Displays the normal hours an employee has worked.
NL (Normal leave): Displays leave hours for an employee at a normal rate.
NH (Normal public holiday): Displays public holiday hours for an employee where public holidays are calculated as working hours.
1.0 (Overtime 1.0): Shows overtime hours paid at 1.0 rate.
1.0 S (Overtime 1.0 on Sundays): Shows overtime hours for Sunday at 1.0 rate.
1.0 H (Overtime 1.0 on public holidays): Shows overtime hours for a public holiday at 1.0 rate.
1.5 (Overtime 1.5): Shows overtime hours at 1.5 rate.
1.5 W (Overtime 1.5 on weekdays): Shows overtime hours for weekdays worked.
1.5 S (Overtime 1.5 on Saturdays): Shows overtime hours at 1.5 rate for Saturdays.
1.5 Sun (Overtime 1.5 on Sundays): Shows overtime hours at 1.5 rate for Sundays.
1.5 H (Overtime 1.5 on public holidays): Shows overtime hours at 1.5 rate for public holidays.
1.6 (Overtime 1.6): Shows overtime hours paid at a rate of 1.6.
2.0 (Overtime 2.0): Shows overtime hours at a rate of 2.0.
2.0 S (Overtime 2.0 on Sundays): Shows overtime hours for Sunday.
2.0 H (Overtime 2.0 on public holidays): Shows overtime hours for public holidays.
MB(Hours before midnight): Displays hours worked before midnight.
MA(Hours after midnight): Displays hours worked after midnight.
L Hr(s) (Lunch hr(s)): Displays lunch hours.
S Hr(s) S (Short hr(s) at start of shift): Displays short hours at the start of a shift.
SHr(s) E (Short hr(s) at end of shift): Displays short hours at the end of a shift.
Short hr(s): Displays the short hours an employee has having not filled up normal hours required.
NT (Night-time): Shows nighttime hours an employee has worked.
Days worked (Summarised only): Shows the total number of days an employee has worked, but only when the report is summarised.
Days absent (Summarised only): Shows total absent days but only when the report is summarised.
Days late (Summarised only): Shows the total number of days an employee is late but only when the report is summarised.
Os comentários não estão permitidos neste curso.