-
Accessing the application
-
Application security
-
Devices and communication protocol
-
Application access control levels
-
Employees, departments and device users
-
Time & Attendance Functionality
-
Access control
-
Batches & payroll integration
-
Binary City Time API (Application Programming Interface)
-
Binary City Time integration with BioTime Technical Documentation
Communication description (Devices)
Importing branch(es) into BC Time
BC Time includes an import feature that allows users to upload multiple branches into the system at once. Once imported, branches become available for selection and can be linked to employee profiles.
As branches are required when creating employee records in BC Time, this functionality provides a faster and more efficient alternative when managing a large number of branches. Rather than adding each individually, users can import them in bulk, reducing administrative effort.
Step 1: Navigate to the branch(es) menu in BC Time.

Step 2: Once in the branch menu, click the meatballs (3 dots ) to access import option.

Step 3: Once you've clicked the "Import" option, the below window will appear, which will allow the user to "download the list of cities" currently available in BC Time as well as download the template that will be populated with the required branches.

The sheet with the list of cities will download, with the following information which will be used in the template; city ID (primary key), Country, Province, Name, Time zone.

Step 4: Once you've downloaded the template, use the information in the cities sheet to update the template with your required branch name and ID (PK). The template below shows the unique cities in Namibia with their respective ID's.

Step 5: Download the template as a csv. file as shown in the image below.

Step 6: Upload the downloaded template, by choosing the file from your saved location.

Step 7: Click Upload data, and the system will validate the data in the template and ready it for import once validation is successful. Click "Import now".

Step 8: Upon successful import, all the branches will then be created in BC Time, with their correct name and city.

For clients using Geofencing, the template allows for the population of the Geofence ID(s), to ensure that the created branches are linked to their required geofence area (if applicable). Step 4 above showed that we had the geofence id for Windhoek and Swakopmund on the sheet, thus when the import was done, these two branches had their geofence areas linked.


Communication description (Devices)
The system has been created to require a local server. This server should be provided by the client, and will be responsible for all communication to and from the devices.
The following minimum specifications are recommended:
The server needs to run on a version of Windows, preferably Windows Server 2012 or higher.
An entry level server with 2 vCPU and 4gb of ram, will be able to run the communication instance, but the higher the server’s specs, the faster the server can communicate with the devices.
50gb of hdd is more than enough for a lifetime of using the product.
No backups are required of this instance, as everything is replicated and saved in the hosted environment, and should anything happen to this instance, we simply recreate it, and all the data will be synced through again automatically.
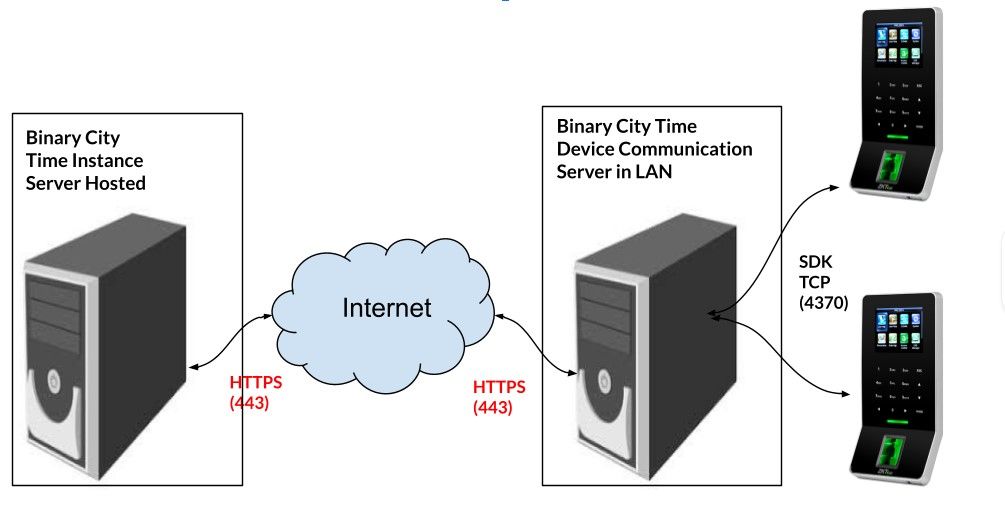
The server has to have access to port 443 (https) in order to access the hosted instance (specific IP addresses can be provided upon request).
The communication server will communicate with the hosted instance securely and then communicate on the Local Area Network / Wide Area Network to the devices.
If required, a central communication server, can talk to all the local devices, but various communication instances may also be deployed if the network prefers this.
The communication server is highly configurable as to how it communicates on the network, and also how often. The following can be set:
How many devices should be communicated with at the same time;
How often should attendance be synced in from the devices;
How often should employee changes be synced to and from the devices;
How often should employee template changes by synced to and from the devices;
How often should the devices report that it’s online (Check-in).
The diagram below shows how the devices talk to the Binary City Time server (hosted), via the Binary City Time Communication server (on premise).
Nenhum comentário até agora.